Monday, February 2, 2009

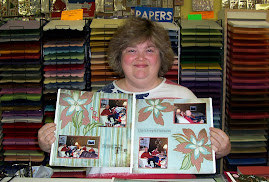
Hand Drawn Bundle Layout #1

I don't normally post layouts with pictures in them, but I got so excited when I was making this layout for our DI teams' Instant Challenge practice that I was halfway through it before I realized I hadn't taken pictures before I added them!

The striped and notebook paper DSP come from the new Level 3 Hostess Set, Hand Drawn Bundle. The bundle includes DSP, stamps, and rub-ons that could be used for a variety of occassions. I plan on using my new Billboard Sizzix Strip alphabet when it comes this week to make my title letters and place them on the striped paper strips. I'm going to journal on the convenient notebook paper lines under the pictures.

When I finished the basic layout, I decided it was too plain. In the pictures the students were using paper plates to build something, so I put strips of cardstock through my crimper and used my 1 inch circle punch to cut them out. In real life it's easier to see how the circles on the paper mimic the plates in the pictures. I can't wait to add the finishing touches and take this layout to school to display in my classroom. The kids will love it!


Friday, January 30, 2009

Candy Lane Layout #4


When melanystamps posted her layout on SCS this week, I knew I had to try it with my Candy Lane scraps! I already had the perfect pictures for it, so I rearranged the elements to accomodate them.


I love how this layout uses the spiral punch to create a place to hang tags! I never would have thought of that! Since I'm getting geared up for SAB (it starts Sunday!) I pulled out some retired SAB tag stamps and other retired tag stamps to find ones that would fit my pictures. I also dug out my Totally Tabs stamps that are still current to make the cool design on the tab. I love that punch!

This layout also gave me a chance to use my star punches. This is the first time I've layered them, and I like the way they helped me stretch out my scraps! I'm going to put my title and journaling in the upper-left and lower-right hand corners and can't wait to add these pages to my book.


Tuesday, January 27, 2009

Candy Lane Layout #3


This is my third layout using the Candy Lane DSP. It's based on one of Stampalooza's challenges at SCS. The Candy Lane DSP is Close to Cocoa with a pattern so light it doesn't really have a color and could be either Pirouette Pink, Whisper White, or Very Vanilla. I used Baja Breeze cardstock for the background and Chocolate Chip and Pacific Point cardstock for the photo mats.


The challenge called for nature stamps, so I mounted the Live Like You Mean It hostess set I got at the very end of the last catalog and stamped three of the flowers at various heights to look like a bouquet. I even used my Double Circle Punch to create tiny Pacific Point centers for the flowers.
I stamped the word LIFE on this side of the layout then made buttons to go on both sides with two of our circle punches. I really like the way the Pacific Point pops in the buttons and as photo mats. This is a very simple but elegant layout.


Monday, January 26, 2009

Candy Lane Layout #2

This layout is also based on a layout by nicholejanette at SCS. I always need birthday pages, and she had a cute layout that used the stamps from last year's SAB. I changed the paper colors, substituting Close to Cocoa cardstock for my background, striped and dotted Candy Lane DSP, Very Vanilla for the paper I stamped, and Riding Hood Red for my mats.

Since the dotted DSP is Pink Pirouette, I stamped the small circle package from my Party Hearty stamp set in Pink Pirouette, one of the party hats in Close to Cocoa, and the party hearty phrase in RHR on the Very Vanilla card stock. For embellishments, I also stamped the cupcake in all three colors, cut them apart, and mixed and matched them so the cupcakes would look like they had icing. I sure wish we had Stampin' Write Markers in the in-colors! I used Stampin' Dimensionals on the cupcakes and on the date label I made with my oval punches.


For embellishments on this side, I used the cupcake and the celebrate you stamps. I stamped celebrate you twice. I punched out the Close to Cocoa version with my 1 3/4 in. punch and the design from the Pink Pirouette version with my 3/4 in. punch and glued them together. Both were attached with Stampin' Dimensionals. I really like how these pages turned out!


Sunday, January 25, 2009

Candy Lane Layout #1


This weekend while I was looking for ideas to help me finish up my I Wish Simply Scrappin' Kit pages, I found this layout by nicholejanette on SCS. I hadn't used my new Candy Lane DSP papers, yet, so I decided to see what I could do with them.


The original layout used circles instead of scallops, but I decided to do something different. I also made my own background paper by wheeling So Swirly across my Riding Hood Red ink pad and covering the Pink Pirouette cardstock with it. Then I used the small flower from Flight of the Butterfly and Chocolate Chip ink to add some contrast.


I also matted the Riding Hood Red DSP from the Candy Lane pack with RHR cardstock to separate it from the background and added Chocolate Chip mats for the pictures. This isn't my usual style, but I like the way it turned out and plan to use my Big Shot to cut letters from Chocolate Chip cardstock for my title once my pictures are in place.

Monday, January 5, 2009

Happy New Year!

The Christmas holidays were incredibly crazy and fun!

I made an 8 x8 scrapbook for my sister-in-law and a 7 x 7 scrapbook for my mother-in-law. I also painted the 4 1/2 x 9 inch chipboard clipboards gun metal gray and adhered Dallas Cowboy themed paper to them for my brother-in-law and nephews. And I gave my MIL, SIL, and mother handmade cards to send out in the new year.

Needless to say, when it was over, I was exhausted!

Last Friday I met with friends to scrapbook and start using my stash of Simply Scrappin' Kit pages. By the end of the night, I had pictures cropped and added to 26 pages. Now I just need to find time to go back and make titles for the pages and journal on them.

I love having pages ready to use so that all I have to do is match the pictures to them. I can't wait to see what the SSKs look like in the new catalog that comes out this month.

Tuesday, December 16, 2008

Christmas Craft Fair

The Christmas Craft fair for our junior high Destination Imagination teams was December 11th and 12th. What a relief to finally have it over!

Instead of pricing everything individually, we priced them by "table" and had $1, $2, $3, $5, and $7 & $10 tables. That worked out extremely well for us.


Surprisingly enough, our most popular sellers were the $1 gift card holder ornaments pictured on this tree. I'm not sure which batch this is because each time we'd finally make enough to fill the tree again, a new person would come in and buy all of them! One customer purchased the 13 that we had in stock and special ordered 7 more!


We had tons of the little mini portfolio gift card holders in stock, but the ones that hang from the tree beat them hands down. We also sold quite a few packages of the reindeer food that's pictured on the left. It wasn't ready until the 2nd day, and I think we'd have sold a lot more if we'd had it ready the first. Several people came and bought stuff from our $1 table to give out as Christmas presents for their children's day care and elementary school class mates. We sold all of our pillow boxes filled with M & Ms for that reason--before we even had a picture of them!


Although the students really enjoyed making these Sizzix boxes, they didn't sell as well as we'd hoped. Part of the problem was that the heater in the gym foyer got too hot the first day and the adhesive in some of the boxes started "melting" and those boxes deflated like balloons! We sold the majority of the whisks we'd made and will probably offer them again next year. I'm not sure how many of them actually made it home as Christmas presents and how many were quickly emptied of their candy by hungry students!


These were the altered frames on the $7 and $10 table. We sold most of the large ones and received several special orders for the word frames. I don't have any pictures of the frames on the $5 table because we couldn't keep them in stock, either! The small frames were sized to hold 4 x 6 pictures, and some customers were snapping up two and three at a time. We'll definitely be offering them again. Instead of wearing the DI team members down, this craft fair seems to have pumped them up! They want to have another one in the spring closer to Mother's Day and Graduation. Since our DI competition is February 28th, we'll have plenty of time to get ready!