Tuesday, September 30, 2008

2nd Best Ever Double-Page Spread


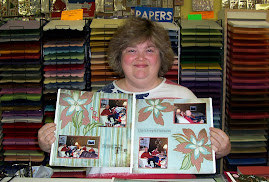
This is the 2nd Best Ever DPS. I must say I'm falling in love with Ridinghood Red! I mourned the loss of Purely Pomegranite when the in-colors changed, but I'm finding that Ridinghood Red is every bit as versatile.


The DSP that came with this kit is very eclectic. One sheet is playful with bright stripes on one side and fun circles with words in them on the other. The other sheet is more elegant with words on one side and a pin-striped kraft colored design on the other.


There are plenty of cardstock stickers to match both sets of DSP designs, and for some reason with this kit, I find myself reaching for my Stampin' Dimensionals more than usual. I just had to use them underneath the circle and star on the right-hand side.

And while I like my pages clean and simple, I realize a lot of my club members need to pack as many pictures as possible on a page so I've left space in the upper left-hand corner and on the right-hand border for more photos if needed. I could definitely envision some circle-cut photos adding extra whimsy to these pages.

Monday, September 29, 2008

Best Ever Simply Scrappin' Kit


The hostess for the October Simply Scrappin' Kit Club chose the Best Ever kit. This kit is very unusual in that it uses THREE new in-colors and whisper white, and I love how these colors look together IRL.


While the kit does include a lot of flower embellishments, this month's hostess chose this kit for one of her friend's son's birthday pictures, so I went with more of the circular elements on my pages. People with girls could easily switch out the circles for flowers.


I also used more Stampin' Dimensionals than usual to really help the accent elements "pop." Our club meets next Sunday, so I'll be posting the other four double-page spreads this week.

Sunday, September 21, 2008

Craft Fair


I spent the weekend working on craft fair items. This is one of the picture frames I made. It uses Bella Rose DSP, Old Olive Ribbon, and one of the Hodgepodge Silver Ribbon Slides. It looks better IRL than it does in the photograph.


I also tried my hand at coaster calendars. This one uses Summer Picnic DSP, Old Olive CS, Real Red Striped Grosgrain ribbon, and Old Olive ribbon. I also used Real Red Classic ink around the edges.


If it were sitting on someone's desk, this is the side that would be facing outward. I can't decide if I want to do anything else to it.

Saturday, September 20, 2008

Card Packet Directions

Everyone has been so nice about the hostess gift I posted last week that I feel guilty about all the attention it's received!

My upline learned how to make the card packets at convention and taught us at a team meeting when she returned. Several people have asked for directions, so I thought I'd better post them.

I'm not very good at writing directions, but this is what I've been telling everyone who has asked:

1. Using an 8 1/2 x 11 sheet of cardstock, score at the 5 1/2 in line
on the 11 in side (or score to divide the paper in half on the long side).

2. On the 8 1/2 in side (short side) score at the 2 1/4 in mark.

3. Once you've folded on the scored lines, it makes the card holder.

4. Cut a small V on the bottom flap of the card holder so it looks
like the inside of a pocket folder kids use at school. (You can
use sticky strip on the outside part of the flap to help keep the
cards from falling out or the flap from falling down.)

5. Use your Cropodile to punch holes at around 3 inches from the
bottom on either side. (You want to make sure the holes are
above the bottom flap.)

6. Cut ribbon long enough to fit through the holes and tie a bow.

7. You want the majority of the ribbon on the inside so it will keep your cards in place.

8. Make two cards to fit in each pocket with matching envelopes.

Hope that makes sense!

My students are helping me make more of these to sell at a Craft Fair for a fund raiser, so I'll be posting more examples sometime this week.

Sunday, September 14, 2008

Hostess Gift


This is what I gave the September Simply Scrappin' Kit Club hostess today. It had one sheet each of Ridinghood Red and Kiwi Kiss 12 x 12 patterned paper and two 8 1/2 x 11 sheets of each of the new in colors.


I also included this card packet with her stuff. I learned how to make it when I attended my team meeting and fell in love with it.


When you open it, there are two birthday cards and two thank you notes inside. The Old Olive 1/4 inch ribbon that ties the packet shut also holds in the cards so they don't fall out.


The birthday cards are made out of Ridinghood Red cardstock. I used a retired jumbo dotted wheel down the right side and matted some Bella Rose DSP with Kiwi Kiss. Then I stamped the birthday greeting with Kiwi Kiss and used the Scallop Punch to cut it out.


The thank you notes are made out of Kiwi Kiss cardstock. I used a retired jumbo rough edged wheel down the right side and matted some Bella Rose DSP with Ridinghood Red. Then I stamped the greeting with Ridinghood Red, punched it with the Scallop Punch, punched a small circle out of Kiwi Kiss, and used a Stampin' Dimensional to make it pop!

Thursday, September 11, 2008

Final UR Sweet Layout


This is the final UR Sweet Layout for the Simply Scrappin' Kit Club that meets this Sunday.

On the left-hand side, the scrapper can choose to put her title on one of the 4 1/4 x 6 1/4 gray mats, the smaller gray mat, or even on the journaling sticker, and to go along with the school theme, I used the spiral punch at the top of the gray mat for the journaling sticker so that it looks like a page ripped out of a mini spiral.

On the right-hand side, I wanted to try something different, so I used four square gray mats that will be perfect for those 4 x 6 pictures that are a little off center and need to be cropped. I also used Stampin' Dimensionals to make the flower sticker "pop."

This has been a really fun kit to work with, and I'm looking forward to designing pages for our October Scrappin' Kit Club meeting that will be using the Best Ever celebration kit--especially since my husband's birthday is in October!

Wednesday, September 10, 2008

4th UR Sweet Layout


Can you say school? Since the UR Sweet Simply Scrappin' Kit contains its own faux notebook paper, I just had to design a page with a faux file folder on it! This fake file folder actually mats two 4 x 6 photos, but doesn't it look cool?

Once again I used the spiral punch on the left-hand side of a decorative strip for the left page and then on the right-hand side for the strip on the opposite page. Both strips also double as places to journal or jot down important information.

The Totally Sweet title is actually a cardstock border sticker cut down to size, and I used Stampin' Dimensionals with the flower stickers to make them "pop" and also leave room for photos underneath them.

This was one of my favorite pages because I love how it came together. I can't wait to add my pictures!

Tuesday, September 9, 2008

3rd UR Sweet Layout


Some of you who have been scrapping with me awhile may recognize this layout. It's one of my favorites. I found it in a magazine last year when I was at a Death by Chocolate Crop in Arlington and used it for a dog layout I was making to swap. For it, I used a gray background with red, black, and white stripes. I liked it so much that I changed the colors and used it in a layout of my dogs that had a beige background and used burgundy, gold, and navy stripes.

Since the Simply Scrappin' Kits come with textured cardstock, I try to design layouts where the texture can show through, and I thought this layout would be perfect for that. I used one of the cardstock stickers from the kit for the title on the left-hand page and the flower and star stickers to embellish the right-hand one.

And although I don't really use tabs a lot on my pages, they came in the kit and added a nice splash of color against the Basic Gray background.

Monday, September 8, 2008

2nd UR Sweet Layout


This is the second UR Sweet layout I made over the weekend. The left-hand side of it is adapted from the UR Sweet packaging. I exchanged the Rose Red background paper in the SU! version for Tempting Turquoise because I wanted to save the Rose Red for a different layout.

I loved that this layout uses the Old Olive ribbon from last spring's Occasions Mini and the flower-shaped ribbon slides from the Silver Hodgepodge Hardware kit. They really give the page a unique look.

It's hard to see on the right-hand page, but the third Basic Gray box at the bottom is embellished with stickers and a journaling box from the kit.

Sunday, September 7, 2008

The First UR Sweet Layout


This is the first UR Sweet layout for our Simply Scrappin' Kit Club next Sunday. I had so much fun working with this kit. Three pieces of the DSP are notebook paper on one side and perfect for the SU! punch that makes paper look like it came out of a spiral. I used a small piece of it here for journaling.

The colors in the kit are Rose Red, Basic Gray, Tempting Turquoise, and Old Olive. I'd never used Rose Red much until the Rose Cottage Simply Scrappin' Kit and this one. It's amazing how well it goes with other colors.

This particular double-page spread is based on a single-page layout that was on the Simply Scrappin' Kit package. I liked two of SU!'s samples this month and incorporated them into our kit club pages. I'll be posting the rest of the pages this week.