Wednesday, February 25, 2009

Birthday Blasts

You may have noticed recently that I've made quite a few birthday pages. As soon as my pictures are ready, I'll be using them and making even more!


My birthday was last Saturday, so two of my classes threw me birthday parties on Friday, and one of them threw a party on Monday. There was so much good food I almost feel like auditioning for a Rolaids commercial!


While everything was wonderful, my favorites were the home-made flan Angelica brought to the first party (I'm a flan addict!), the sliced barbecue soft tacos with cilantro and green sauce Yesenia brought to the second party (I'm a BIG fan of green sauce), and the cake and ice cream Tucker brought to the third party that also included a petite cake for me to take home and share with my husband. Isn't it cute?

Monday, February 23, 2009

Raspberry Tart Layout #3

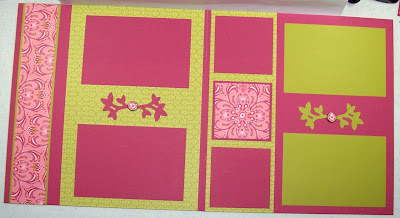
Putting this layout together was so much fun! I challenged myself to use the DSP and Rose Red cardstock scraps from my previous layouts, and this is what I came up with.

Textured Kiwi Kiss cardstock became my base, and although you can't tell it in these photos, the strips made from the new Lace Border punch are actually DSP in Rose Red with a light pattern on it.

I love the way the scraps made me leave my comfort zone and try something different! Even my photo mats are odd sizes for me, and I've tried not to crop and fix all my photos before I print them so I can experiment. To finish it off (before I add pictures, a title, and journaling), I used my Round Tab punch to make embellishments from the other side of the DSP. After this experience, I definitely think scraps rock!


Sunday, February 22, 2009

Raspberry Tart Layout #2

I'm still in love with the Raspberry Tart DSP and the SU! exclusive Sizzix Sweetest Stem Embosslit die. The die was made to match the Raspberry Tart paper and really embellishes it well.

While this page may look like it has strips of the DSP on it, I actually used strips of the Real Red textured cardstock to divide the DSP because I happened to have them left over from another project. This particular DSP has white in it so I decided to use Whisper White as my photo mats. I also used Stampin' Dimensionals to pop the die-cut flowers.

I left room on the right-hand side to put my title, and I may do my journaling with the awesome SU! white gel pen. I think it would look really good written on the red cardstock strips on both pages. Tomorrow I'll post the pages I made from the scraps of the first two layouts!


Monday, February 16, 2009

Raspberry Tart Layout #1


After working with the peaceful tranquility of the SAB Designer Series Papers, I decided I was ready for something different! The new Raspberry Tart DSP is bursting with juicy colors: Kiwi Kiss, Real Red, Rose Red, Cameo Coral, and Pretty in Pink. I'd already been warned by fellow demos at SCS that a little goes a l-o-n-g way, so for my first layout I chose one of the more subtle Kiwi Kiss designs and threw in one of the brighter DSPs for embellishment.

The DSP I used for embellishment also gave me a chance to use my new SU! exclusive Sizzix embosslit, Sweetest Stem. If you've never used an embosslit, they are amazing! They cut and emboss at the same time! How easy is that?

And to add a finishing touch, I used my build-a-brads and punched one of the little flowers out of the DSP to accent inbetween the embossed stems. Voila! What an easy accent to make to tie everything together.


Sunday, February 15, 2009

SAB Layout #4

I saw a magazine layout that used 2 x 2 squares and thought I'd try it, but the pattern didn't work for my pictures, so I came up with this instead.

I put a title strip on the left and made the mat large enough to hold two photos. I also used the new SU! lace border punch and like how the lace edge compliments the old-timey feel of the quilt squares. I also used my 3/4 in. circle punch to make buttons and put them on Stampin' Dimensionsals so they wouldn't interfere with photo placement later.


I didn't get the idea to use the new lace border punch until I'd already glued the mats down on this page, but I didn't let that stop me! I just made lace edges to attach to the photo mats and used the Bashful Blue cardstock to cover where the two pieces of Whisper White came together. I liked the look so much that I used it on the other page as well. I hope you're enjoying the pages I'm making with the SAB paper; it is so versatile!

Thursday, February 12, 2009

Good Morning Sunshine Layout #1


When I received my Good Morning Sunshine paper in my order last week, I'd planned on making a layout with the retro-flowered paper first. Even though green is one of my favorite colors, the Kiwi Kiss and Summer Sun used in this DSP were a bit over powering for me!


Then I got the idea of matting with Pacific Point, and it all came together. Especially when I realized I could replace the centers of the pears with 1/4 in. Pacific Point circles! That gave me the excuse to use my favorite SU! white gel pen to make the seeds and also add a little Whisper White card stock for contrast. I love how the blue and white pop on the page! I even used Stampin' Dimensionals so my punched pear would stand out.

The mat on this page holds two 4 x 6 photos. I included two more punched pears on Stampin' Dimensionals for embellishments and half of the SU! exclusive Sizzix Top Note die for my title box. My new SU! exclusive Sizzix Billboard alphabet strip has really been getting a work out since it came in. I used it to make my title letters.


Wednesday, February 11, 2009

SAB Layout #3

This layout is based on a Becky Fleck page map in the January/February issue of Memory Makers magazine. It's definitely more labor intensive than my previous layouts, but I love how it show cases so many SU! products.

This side uses the new lace border punch, Sizzix Scallop #2, the Boho Blossoms punch, the SU! exclusive Little Leaves Sizzix die, and the SU! exclusive Billboard Alphabet Sizzix strip die. I also used the retired SU! 1/4 in. circle punch and wish I'd ordered extras since it makes the perfect faux brads around the right-hand side of the scallop.

This side also uses the Little Leaves Sizzix die to create the vine image, the Boho Blossoms punch, the 1/4 in. circle punch for the flower centers, the lace border punch, the Billboard Alphabet strip die, and the beautiful SAB So Saffron ribbon. I really love how the blue-patterned SAB Designer Series Paper makes the flower centers pop. Now I can't wait for spring to get here so our yellow roses will start blooming and I can add their pictures to these pages!


Monday, February 9, 2009

SAB Layout #2


This layout is based on a scrap map by Heather Summers, a Canadian SU! demo. I had so much fun using the SAB Designer Series Paper, Certainly Celery Ribbon, and Polka Dot Punches stamps on this layout. This DSP was designed to match the stamps, so everything is super easy to coordinate!


This page will hold 4 photos. I used my new Sizzix Billboard Alphabet Strip to make my title, IMPROV. I love the subtle white stitching on the DSP. It looks tons better in real life!


For some reason, the letters didn't show up as well in the photo of this page, but I used the same alphabet for my sub title, Instant Challenges. This page will hold three photos or two photos and journaling.

Wait until you see SAB Layout #3 tomorrow! I used more of the SAB products, including the So Saffron ribbon, and one of my new SU! exclusive Sizzix Dies. I can't wait to share what I came up with!

Sunday, February 8, 2009

SAB Layout #1

Last Tuesday, we took our DI teams to an Instant Challenge Workshop/Competition, and I took tons of pictures! The kids did an excellent job and came back ready to work hard to prepare for competition on February 28th. I came back ready to whip up some quick pages to use when the pictures are developed!

This page is based on a layout in the current Scrapbooks, etc. magazine. The blue mat holds two 4 x 6 photos. The pages in this double-page spread use Certainly Celery cardstock for their background and the new SAB Designer Series Papers for embellishments. This package of DSP contains 16 sheets of double-sided papers in Certainly Celery, So Saffron, Sahara Sand, and Bashful Blue. I love how light and "springy" they look! Also, the items in this year's SAB catalog coordinate so there's So Saffron and Certainly Celery ribbon as a selection, and the patterns on this DSP match the stamp set in the catalog that also goes with all our punches.

My first order from the new catalog arrived this week. Along with the cool new SAB products I earned, I was excited to get the Bigz Serif Essentials alphabet. I'd been waiting until SAB to order it since it qualifies for 3 SAB items by itself. I love the way it looks on the DI FUN title.

Saturday, February 7, 2009

Hand Drawn Bundle Layout #2

This is another layout based on one by melonystamps. I changed it to a birthday theme and used some more DSP from my Level 3 Hand Drawn Hostess gift.

The layout by melonystamps used flowers where I put the half-circle tab and the small grey circles. Her DSP was more feminine and the flowers looked perfect with it. Since I wanted this layout to work for either males or females, I decided to go with the circles instead.

The white cardstock that covers part of the circle was also placed higher on her layout, but I wanted to leave room around the circle to put a title later. My new Sizzix alphabet will be perfect!


Monday, February 2, 2009

Hand Drawn Bundle Layout #1

I don't normally post layouts with pictures in them, but I got so excited when I was making this layout for our DI teams' Instant Challenge practice that I was halfway through it before I realized I hadn't taken pictures before I added them!

The striped and notebook paper DSP come from the new Level 3 Hostess Set, Hand Drawn Bundle. The bundle includes DSP, stamps, and rub-ons that could be used for a variety of occassions. I plan on using my new Billboard Sizzix Strip alphabet when it comes this week to make my title letters and place them on the striped paper strips. I'm going to journal on the convenient notebook paper lines under the pictures.

When I finished the basic layout, I decided it was too plain. In the pictures the students were using paper plates to build something, so I put strips of cardstock through my crimper and used my 1 inch circle punch to cut them out. In real life it's easier to see how the circles on the paper mimic the plates in the pictures. I can't wait to add the finishing touches and take this layout to school to display in my classroom. The kids will love it!